How To Increase WordPress Memory Limit
What Is WordPress Memory Limit?
The WordPress Memory Limit is the maximum amount of memory (RAM) that your website can use at one time. When your site reaches the allocated memory limit, you will encounter a fatal error.
There are several factors that contribute to the consumption of your memory. The notable ones are your WordPress itself, the theme that you are using, and the list of active plugins.
Generally speaking, the bigger and more complex your website is, the more memory it needs.
Why Do I Need To Increase My WP Memory Limit?
The default memory limit for WordPress is 32MB. This limit might be enough for small websites with a limited number of plugins and visitors.
However, if you need to install a fully functional demo of a premium theme or you have a large list of custom plugins that require installation, then increasing your memory limit would be a wise action to take.
Basically, when you start encountering the “Fatal Error: Memory Size Exhausted“, it would be the right time for you to make such changes.
How To Increase The WP Memory Limit?
Method 1 – Change The WP Memory Limit Using The (php.ini) File
- Find or locate your php.ini file. If you can not find it, then simply create your own php.ini file and place it in the root directory of your WordPress installation.
- Open your php.ini file then edit it using your favorite editor.
- Find the line: memory_limit = 32M
- Change the 32M or any number you find there to your desired limit (e.g. 1024M).
- Save your changes and reboot your localhost or server.
Note 1: Many shared hosting providers restrict you from accessing the php.ini file. This method is only applicable in case you have direct access to your php.ini file or if you are running your WordPress on localhost. It is good to note as well that this method only affects your PHP memory limit.
Note 2: If you have created your own php.ini file, then you need to add to the file the code line below:
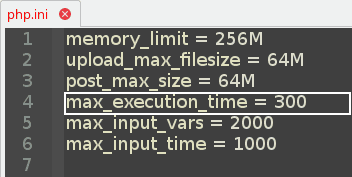
memory_limit = 1024M

Method 2 – Change The WP Memory Limit Using The (wp-config.php) File
- Find your wp-config.php file in the root directory of your WordPress installation.
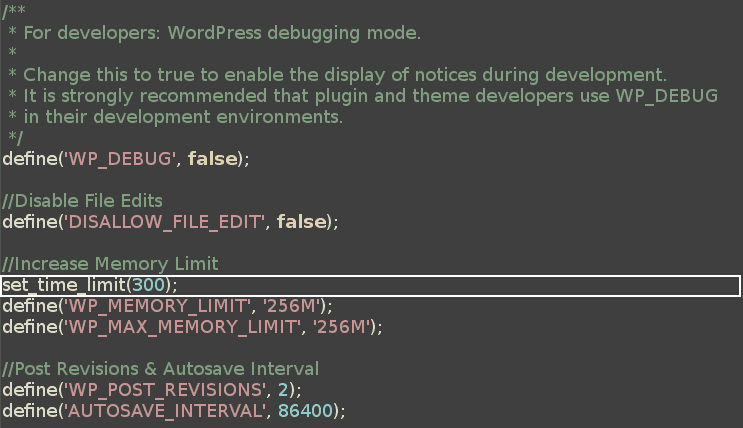
- Open the wp-config.php file with a text editor then locate the line that includes: define(‘WP_DEBUG’, false);
- Then add after it, the below line of code: define (‘WP_MEMORY_LIMIT’, ‘1024M’);
- Save the wp-config.php file then refresh your website.

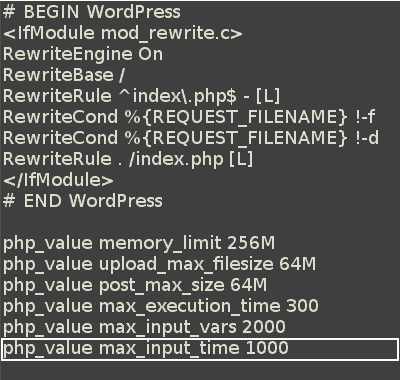
Method 3 – Change The WP Memory Limit Using The (.htaccess) File
- Search for your .htaccess file which should be located in the root directory of your WordPress installation. If you can’t find it then it might be hidden. Thus, make sure to check your hidden files when locating it.
- Open the .htaccess file with a text editor and add the following line of code:
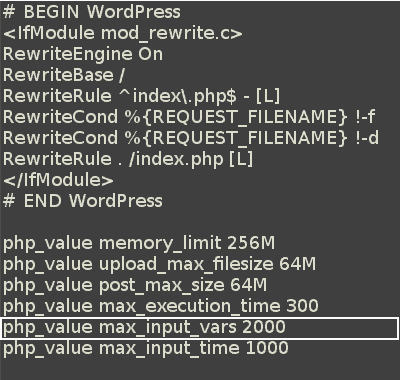
php_value memory_limit 1024M - Save the .htaccess file then refresh your website.

How To Increase Upload Max Size
What Is Upload Max Size?
It is the maximum allowed size for a file to upload to your WordPress website. A file can be a plugin, theme, image, audio, video, or any other kind of file. The default size is 2MB which is considered by many webmasters a very low upper limit for the allowed upload file size.
Why Do I Need To Increase WP Upload Max Size?
If you upload big images, audio/video, or plugin files that surpasses the default limit, then it might be easier for you to increase your maximum file upload size along with your maximum post size instead of constantly using the FTP manager.
How To Increase WP Upload Max Size?
Method 1 – Change The Maximum File Upload Size Using The Theme (functions.php) File
- Open your theme files and locate the functions.php file. You can also contact your theme developer for assistance if required.
- Add the below code lines to the file:
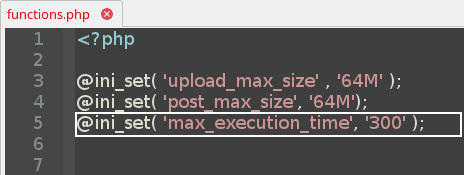
@ini_set(‘upload_max_size’ , ’64M’); - Save the functions.php file then refresh your website.

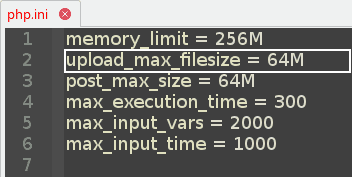
Method 2 – Change The Maximum File Upload Size Using The (php.ini) File
- Find or locate your php.ini file. If you can not find it, then simply create your own php.ini file and place it in the root directory of your WordPress installation.
- Open your php.ini file then edit it using your favorite editor as follows:
– Find the line of:
upload_max_filesize = 2M
– Change the 2M or any number you find there to your desired limit (e.g. 64M).Note: If you have created your own php.ini file, then you need to add to the file the code line below:
upload_max_filesize = 64M - Save your changes and reboot your localhost or server.
Method 3 – Change The Maximum File Upload Size Using The (.htaccess) File
- Search for your .htaccess file which should be located in the root directory of your WordPress installation. If you can’t find it then it might be hidden. Thus, make sure to check your hidden files when locating it.
- Open the .htaccess file with a text editor and add the following line of code.
php_value upload_max_filesize 64M - Save the .htaccess file then refresh your website.

How To Increase Post Max Size
What Is Post Max Size?
It is the maximum size of the allowed post data. This setting also affects file upload.
To upload large files, this value must be larger than upload_max_filesize. Generally speaking, memory_limit should be larger than post_max_size.
Why Do I Need To Increase Post Max Size?
If you upload big images, audio/video, or plugin files that surpass the default limit, then it might be easier for you to increase your maximum post size along with your maximum file upload size instead of constantly using the FTP manager.
How To Increase Post Max Size?
Method 1 – Change The Maximum Post Size Using The Theme (functions.php) File
- Open your theme files and locate the functions.php file. You can also contact your theme developer for assistance if required.
- Add the below code lines to the file:
@ini_set( ‘post_max_size’, ’64M’); - Save the functions.php file then refresh your website.

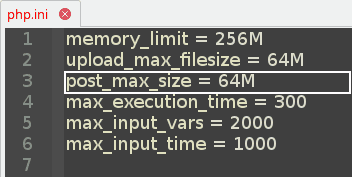
Method 2 – Change The Maximum File Upload Size Using The (php.ini) File
- Find or locate your php.ini file. If you can not find it, then simply create your own php.ini file and place it in the root directory of your WordPress installation.
- Open your php.ini file then edit it using your favorite editor as follows:
– Find the line of:
post_max_size = 32M
– Change the 32M or any number you find there to your desired limit (e.g. 64M).Note: If you have created your own php.ini file, then you need to add to the file the code line below:
post_max_size = 64M - Save your changes and reboot your localhost or server.
Method 3 – Change The Maximum Post Size Using The (.htaccess) File
- Search for your .htaccess file which should be located in the root directory of your WordPress installation. If you can’t find it then it might be hidden. Thus, make sure to check your hidden files when locating it.
- Open the .htaccess file with a text editor and add the following line of code.
php_value post_max_size 64M - Save the .htaccess file then refresh your website.

How To Increase The Max Execution Time (PHP Time Limit)
What Is The Maximum Execution Time?
The PHP Maximum Execution Time or PHP Time Limit is the amount of time in seconds that your website will spend on a single operation before timing out. This is useful to avoid any potential server lockup. The default value of the PHP Time Limit is 40 seconds. When a certain operation reaches this execution time limit, the system will return the following fatal error:
The maximum execution time of X seconds exceeded. ( Where “X” is the value ).
Why Do I Need To Increase My Maximum Execution Time?
If you installing a big plugin or a complete demo for a theme, then the default value of 40 seconds might not be enough to complete the operation. You can also increase your PHP time limit temporarily then decrease it back after the completion of your long operations.
How To Increase The Maximum Execution Time?
Method 1 – Change The Maximum Execution Time Using The Theme (functions.php) File
- Open your theme files and locate the functions.php file. You can also contact your theme developer for assistance if required.
- Add the below code lines to the file:
@ini_set(‘max_execution_time’, ‘300’); - Save the functions.php file then refresh your website.
Method 2 – Change The Maximum Execution Time Using The (php.ini) File
- Find or locate your php.ini file. If you can not find it, then simply create your own php.ini file and place it in the root directory of your WordPress installation.
- Open your php.ini file then edit it using your favorite editor as follows:
– Find the line of:
max_execution_time = 40
– Change the 40 or any number you find there to your desired limit (e.g. 300).
Note 1: If you have created your own php.ini file, then you need to add to the file the code line below:
max_execution_time = 300
Note 2: Many shared hosting providers restrict you from accessing the php.ini file. This method is only applicable in case you have direct access to your php.ini file or if you are running your WordPress on localhost.
Method 3 – Change The Maximum Execution Time By Editing the (wp-config.php) File
- Find your wp-config.php file in the root directory of your WordPress installation.
- Open the wp-config.php file with a text editor then locate the line that includes:
define(‘WP_DEBUG’, false);
Then add after it, the below line of code:
set_time_limit(300); - Save the wp-config.php file then refresh your website.
How To Increase The PHP Max Input Vars
What Is The PHP Max Input Vars?
The PHP Max Input Vars is the maximum number of variables your server can use for a single function to avoid overloads. The default value of the PHP Max Input Vars is 1000.
Why Do I Need To Increase My PHP Max Input Vars?
Increasing the PHP Max Input Vars helps in solving some issues related to your menus. If your menu items are not saving successfully or the last entries are being truncated or left off, then increasing this value will be a recommended action. This is especially useful when you are installing a big demo for a theme with lots of menu entries.
How To Increase The PHP Max Input Vars?
Method 1 – Change The PHP Max Input Vars Using The (php.ini) File
- Find or locate your php.ini file. If you can not find it, then simply create your own php.ini file and place it in the root directory of your WordPress installation.
- Open your php.ini file then edit it using your favorite editor as follows:
– Find the line of: max_input_vars = 1000
– Change the 40 or any number you find there to your desired limit (e.g. 2000).
Note 1: If you have created your own php.ini file, then you need to add to the file the code line below:
max_input_vars = 2000
Note 2: Many shared hosting providers restrict you from accessing the php.ini file. This method is only applicable in case you have direct access to your php.ini file or if you are running your WordPress on localhost.

Method 2 – Change The PHP Max Input Vars Using The (.htaccess) File
- Search for your .htaccess file which should be located in the root directory of your WordPress installation. If you can’t find it then it might be hidden. Thus, make sure to check your hidden files when locating it.
- Open the (.htaccess) file with a text editor and add the following line of code:
php_value max_input_vars 2000 - Save the (.htaccess) file then refresh your website.
How To Increase The PHP Max Input Time
What Is The PHP Max Input Time?
The PHP Max Input Time sets the maximum time in seconds a script is allowed to parse input data, like POST and GET. Timing begins at the moment PHP is invoked at the server and ends when execution begins.
Why Do I Need To Increase My PHP Max Input Time?
Increasing the PHP Max Input Time helps in solving issues when uploading large files or installing a big demo of a premium theme.
How To Increase The PHP Max Input Time?
Method 1 – Change The PHP Max Input Time Using The (php.ini) File
- Find or locate your php.ini file. If you can not find it, then simply create your own php.ini file and place it in the root directory of your WordPress installation.
- Open your php.ini file then edit it using your favorite editor as follows:
– Find the line of:
max_input_time = 120
– Change the 120 or any number you find there to your desired limit (e.g. 1000).
Note 1: If you have created your own php.ini file, then you need to add to the file the code line below:
max_input_time = 1000
Note 2: Many shared hosting providers restrict you from accessing the php.ini file. This method is only applicable in case you have direct access to your php.ini file or if you are running your WordPress on localhost.

Method 2 – Change The PHP Max Input Time The (.htaccess) File
- Search for your (.htaccess) file which should be located in the root directory of your WordPress installation. If you can’t find it then it might be hidden. Thus, make sure to check your hidden files when locating it.
- Open the (.htaccess) file with a text editor and add the following line of code:
php_value max_input_time 1000 - Save the (.htaccess) file then refresh your website.